Best Warm Baked Pears with Blue Cheese & Honey: An Elegant Dessert or Appetizer
These Best Warm Baked Pears with Blue Cheese & Honey offer a perfect balance of sweet and savory flavors. When you bake ripe pears until tender, then top them with creamy blue cheese and a drizzle of honey, you create a dish that works equally well as an elegant appetizer or a sophisticated dessert. The warmth of the baked fruit enhances its natural sweetness, while the tangy cheese adds depth and complexity.
What makes this recipe truly special is its versatility. You can serve these Best Warm Baked Pears with Blue Cheese & Honey at holiday gatherings, dinner parties, or even as a special weeknight treat. The combination of textures—from the soft pears to the crumbly cheese—creates an unforgettable eating experience. Moreover, the presentation looks impressive despite requiring minimal effort, making it perfect for both experienced cooks and beginners.
Quick Recipe Highlights
- Flavor Profile: The Best Warm Baked Pears with Blue Cheese & Honey deliver a perfect harmony of sweet and savory notes. The natural sugars in the pears caramelize during baking, while the blue cheese adds a sharp contrast that balances the honey’s floral sweetness.
- Texture: You’ll enjoy tender, juicy pears with a slightly crisp edge, topped with creamy yet crumbly cheese that melts slightly from the residual heat. The honey adds a smooth, velvety finish that ties all elements together.
- Aroma: As the pears bake, your kitchen fills with their sweet, fruity fragrance. When you add the pungent blue cheese and aromatic honey, the scent becomes complex and inviting, making everyone eager to taste the dish.
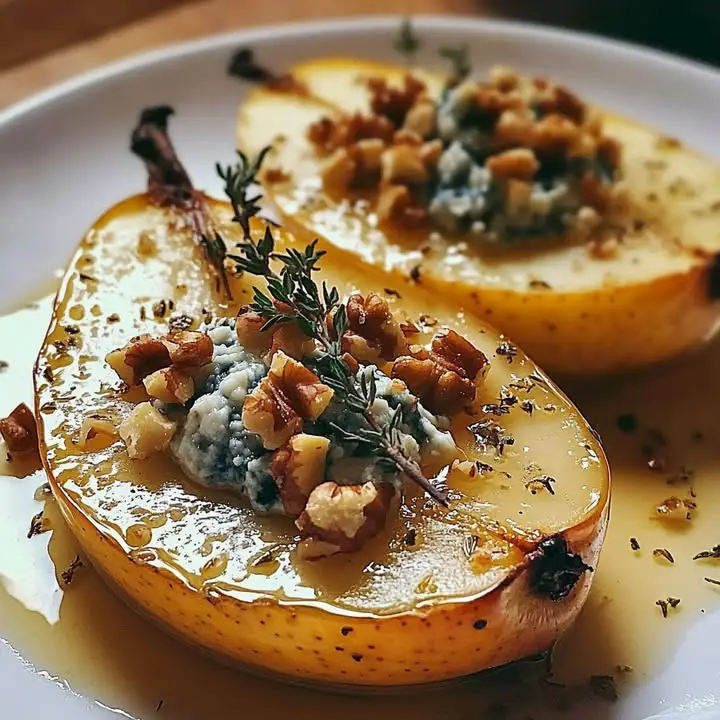
- Visual Appeal: The golden-brown pears with their creamy cheese topping create an elegant contrast on the plate. A final drizzle of honey adds shine and sophistication, making this dish as beautiful as it is delicious.
- Skill Level Needed: This recipe requires basic kitchen skills like coring fruit and using an oven. Even novice cooks can achieve excellent results by following the simple steps.
- Special Equipment: You only need a baking dish and a small knife. A melon baller helps with coring but isn’t essential.
Recipe Overview
- Difficulty Level: These Best Warm Baked Pears with Blue Cheese & Honey rank as easy to prepare. The technique involves simple baking and assembly, with no complicated steps. Even if you’ve never baked fruit before, you’ll find the process straightforward.
- Category: This dish straddles multiple categories beautifully. Serve it as an elegant appetizer to start a dinner party, or present it as a light dessert after a rich meal. It also works well as part of a cheese course or charcuterie board.
- Cuisine: While not tied to any specific culinary tradition, the combination of fruit, cheese, and honey appears in various European cuisines. The French might serve something similar as a dessert course, while Italians might include it in an antipasto spread.
- Cost: This recipe uses affordable ingredients that offer excellent value. Pears remain reasonably priced in season, and a small amount of quality blue cheese goes a long way. Honey, a pantry staple, adds luxury without breaking the bank.
- Season: Autumn and winter showcase pears at their best, making this an ideal cold-weather dish. However, you can find good pears year-round in most supermarkets, allowing you to enjoy this recipe whenever the craving strikes.
- Occasion: The elegant presentation makes these Best Warm Baked Pears with Blue Cheese & Honey perfect for special occasions. Serve them at holiday gatherings, anniversary dinners, or anytime you want to impress guests with minimal effort.
Why You’ll Love This Recipe
The Best Warm Baked Pears with Blue Cheese & Honey deliver incredible flavor with minimal effort. Unlike complicated desserts that require precise measurements and techniques, this recipe forgives small variations. You can adjust the amount of cheese or honey to suit your taste, and the pears will still turn out delicious. Furthermore, the dish comes together quickly, making it ideal for last-minute entertaining.
Nutritionally, this recipe offers benefits beyond its delicious taste. Pears provide fiber and vitamin C, while blue cheese contributes calcium and protein. When you use raw, unfiltered honey, you add antioxidants to the mix. Compared to heavy desserts loaded with refined sugar, these baked pears feel indulgent without leaving you sluggish afterward.
Entertaining becomes effortless with this versatile dish. The Best Warm Baked Pears with Blue Cheese & Honey work equally well for casual gatherings and formal dinners. Guests always appreciate the thoughtful combination of flavors, and the presentation looks far more impressive than the actual work required. You can prepare components ahead of time, then assemble just before serving for maximum freshness.
Cost-effectiveness makes this recipe appealing for budget-conscious cooks. While the ingredients sound gourmet, they actually represent excellent value. A single pear serves one person generously, and high-quality blue cheese comes in small portions that stretch across multiple servings. Honey, while sometimes pricey, gets used sparingly to maximize its impact.
Accessibility matters in any great recipe, and this one delivers. You can find all ingredients at standard supermarkets, though specialty stores might offer more variety. The recipe adapts easily to what’s available—swap pear varieties based on seasonality or try different blue cheeses to discover your favorite combination.
Historical Background and Cultural Significance
The combination of fruit and cheese dates back centuries in European culinary traditions. Various cultures recognized how the sweetness of ripe fruit complements the saltiness of aged cheeses. While we can’t pinpoint the exact origin of baked pears with blue cheese, similar dishes appear in French and Italian cooking. Monasteries during the Middle Ages often paired their homemade cheeses with fruits from their orchards.
Blue cheese itself has a fascinating history, with legends suggesting its discovery by accident in caves where cheese aged naturally. The distinctive mold that gives blue cheese its character developed in these cool, humid environments. When paired with sweet elements like pears or honey, the bold flavor of blue cheese becomes more approachable, creating a balance that has stood the test of time.
Honey’s role in gastronomy stretches back even further, with evidence of its use in ancient civilizations. Its natural sweetness made it a valuable commodity long before refined sugar became widely available. Drizzling honey over cheese and fruit represents one of the oldest dessert concepts, updated here with the modern technique of baking the pears for enhanced flavor.
Regional variations of this concept abound throughout Europe. The French might use Roquefort cheese with their beloved Comice pears, while Italians could opt for Gorgonzola and local honey. In recent decades, this combination has gained popularity worldwide as chefs and home cooks appreciate its simplicity and sophistication.
Ingredient Deep Dive
Pears form the foundation of this dish, and choosing the right variety makes all the difference. Bartlett pears work beautifully for baking because they hold their shape while becoming tender. Anjou pears offer a slightly firmer texture that some prefer. Look for fruit that yields slightly to gentle pressure near the stem but remains firm elsewhere. Store unripe pears at room temperature until they reach perfect ripeness, then refrigerate to extend their shelf life.
Blue cheese brings the savory element that elevates this dish beyond simple baked fruit. Traditional options like Roquefort or Stilton offer robust flavor, while milder varieties like Gorgonzola Dolce work well for those new to blue cheeses. Purchase cheese in small wedges from the deli counter for freshness. Wrap leftover cheese tightly in parchment paper followed by plastic wrap, and store in the refrigerator’s cheese drawer for up to two weeks.
Honey provides the finishing touch that ties all elements together. Raw, unfiltered honey offers the most complex flavor and potential health benefits. Local varieties add regional character to the dish. For a different twist, try flavored honeys like chestnut or lavender. Store honey at room temperature in a tightly sealed container to prevent crystallization. If your honey does crystallize, gently warm the jar in warm water to return it to liquid form.
Common Mistakes to Avoid
- Choosing overripe pears that will turn mushy during baking. The fruit should be firm-ripe for best results.
- Using pears that are too hard and unripe, which won’t develop sufficient sweetness when baked.
- Overcrowding the baking dish, which prevents even cooking and caramelization.
- Adding the blue cheese too early, causing it to melt completely rather than just soften.
- Drizzling honey before baking, which can cause it to burn rather than complement the flavors.
- Skipping the resting time after baking, when the flavors actually develop further.
- Using low-quality blue cheese that lacks character or has unpleasant bitterness.
- Overbaking the pears until they lose their shape and become difficult to serve neatly.
Essential Techniques
Proper pear preparation ensures even cooking and attractive presentation. Start by halving the pears lengthwise, then use a melon baller or teaspoon to carefully remove the core and seeds. Leaving the stem intact on one half adds visual appeal. Create a flat surface by trimming a small slice from the rounded side so the pears sit securely in the baking dish.
Baking temperature matters for achieving the perfect texture. A moderate oven temperature of 375°F (190°C) allows the pears to soften gradually without burning. The heat concentrates the pears’ natural sugars, enhancing their sweetness. Check for doneness by inserting a paring knife into the thickest part of a pear—it should meet slight resistance but not feel hard.
Pro Tips for Perfect Best Warm Baked Pears with Blue Cheese & Honey
- Select pears of similar size and ripeness for even cooking throughout the batch.
- Brush the cut surfaces of the pears with lemon juice to prevent browning if preparing ahead.
- Add a splash of white wine or apple cider to the baking dish for extra flavor dimension.
- Toast walnuts or pecans to sprinkle over the top for added crunch and nutty flavor.
- Let the baked pears rest for 5 minutes after removing from the oven to allow flavors to meld.
- Serve on warm plates to maintain the ideal temperature throughout the eating experience.
Variations and Adaptations
For a seasonal twist, try using apples instead of pears during autumn months. Choose firm varieties like Honeycrisp or Pink Lady that hold their shape when baked. The slightly tarter flavor of apples pairs beautifully with the rich blue cheese and honey. Adjust baking time as needed since apples may require slightly longer to soften depending on variety and ripeness.
Dietary adaptations make this recipe accessible to more people. Vegan versions can substitute cashew cream or vegan blue-style cheese alternatives. For a dairy-free option, try crumbled toasted walnuts instead of cheese. While the flavor profile changes, the contrast between sweet and savory elements remains pleasing. Those avoiding honey can use maple syrup or agave nectar as alternatives.
Serving and Presentation Guide
Presentation elevates these Best Warm Baked Pears with Blue Cheese & Honey from simple to spectacular. Arrange two pear halves per serving plate, placing them cut side up. Crumble the blue cheese evenly over the warm pears, allowing some to melt slightly. Drizzle honey in an attractive pattern over and around the pears. Garnish with fresh thyme sprigs or edible flowers for color contrast.
Temperature considerations impact the eating experience. Serve the pears warm but not piping hot to allow all flavors to shine. The cheese should soften from the pear’s residual heat without melting completely. If preparing ahead, you can bake the pears early and rewarm them gently before adding the cheese and honey components.
Wine and Beverage Pairing
Wine pairings enhance this dish’s sophisticated flavors. A late-harvest Riesling or Sauternes complements the pears’ sweetness while standing up to the blue cheese’s intensity. For red wine lovers, a Port or Banyuls offers rich fruit flavors that harmonize beautifully. Always serve dessert wines slightly chilled to balance their sweetness.
Non-alcoholic options work equally well. Sparkling apple cider provides refreshing contrast, while a honey-sweetened chamomile tea echoes the floral notes in the dish. For something more substantial, try a chai latte with its warm spices that complement the baked fruit flavors.
Storage and Shelf Life
Storage methods depend on preparation stage. Unbaked prepared pears keep well in the refrigerator for up to 24 hours when covered tightly with plastic wrap. After baking, store leftovers in an airtight container in the refrigerator for up to 3 days. Reheat gently in a low oven or microwave before serving.
Freezing affects texture significantly, making it less ideal for this recipe. The pears become mushy upon thawing, though you could freeze the unbaked prepared pears if necessary. Thaw overnight in the refrigerator before baking as directed. The cheese and honey components should always remain fresh for best quality.
Make Ahead Strategies
Prep timeline flexibility makes this recipe entertainer-friendly. You can core and halve the pears up to a day in advance, storing them in acidulated water to prevent browning. The blue cheese can be crumbled ahead and kept refrigerated in an airtight container. Only assemble the complete dish just before serving for optimal texture and presentation.
Quality impact varies by component. The baked pears actually develop more flavor when allowed to cool slightly before serving. The cheese maintains better texture when added just before serving rather than during baking. Honey always tastes best at room temperature rather than chilled or heated excessively.
Scaling Instructions
Doubling or tripling the recipe works well for larger gatherings. Use multiple baking dishes or a larger pan to avoid overcrowding. Rotate pans halfway through baking if using multiple oven racks. Increase baking time by 5-10 minutes when working with larger quantities, checking for doneness regularly.
Halving the recipe suits smaller households perfectly. Use a small baking dish or even a toaster oven for just a few pear halves. Reduce baking time slightly since smaller quantities cook faster. This adaptation makes the recipe practical for weeknight treats rather than just entertaining.
Nutritional Deep Dive
Macro breakdown reveals a balanced profile. Pears contribute carbohydrates primarily as natural sugars and fiber. Blue cheese provides protein and fat, creating satiety. Honey adds minimal amounts of additional carbohydrates but significant flavor impact. Together, these components create a dish that satisfies without excessive calories.
Micronutrient content varies by ingredient. Pears offer vitamin C and potassium, while blue cheese provides calcium and phosphorus. Darker honeys contain more antioxidants than lighter varieties. Using whole, unprocessed ingredients maximizes the nutritional benefits compared to refined dessert options.
Dietary Adaptations
Gluten-free needs require no modifications since the recipe naturally contains no gluten. For dairy-free versions, substitute vegan cheese alternatives or toasted nuts. Vegan adaptations replace both cheese and honey with plant-based options. Low-carb diets can reduce the honey quantity or use sugar-free substitutes, focusing on the cheese’s richness.
Keto followers should use full-fat blue cheese and limit honey to a light drizzle. Paleo diets permit honey but exclude dairy, suggesting nut-based toppings instead. Low-FODMAP needs require careful portion control of both pears and honey, with lactose-free cheese as an option.
Troubleshooting Guide
Texture issues usually stem from pear selection or baking time. If pears turn mushy, they were likely overripe before baking. Undercooked pears need additional time in the oven, covered with foil if browning too quickly. Cheese that melts completely was either added too soon or the pears were too hot when topped.
Flavor balance adjustments happen easily. If the dish tastes too sweet, add more cheese or a sprinkle of sea salt. Overly pungent cheese can be tempered with extra honey or a squeeze of lemon juice. Always taste components separately before assembling to predict the final flavor profile.
Recipe Success Stories
Home cooks consistently praise how these Best Warm Baked Pears with Blue Cheese & Honey impress guests with minimal effort. Many report receiving compliments and requests for the recipe at dinner parties. Some creative variations have emerged, including additions like candied ginger or balsamic glaze that put personal spins on the basic formula.
Photography tips from successful makers emphasize natural lighting that showcases the golden pears and white cheese. Overhead shots work well to display the honey drizzle pattern, while close-ups highlight the melty cheese texture. Simple white or wooden backgrounds keep focus on the food’s natural beauty.
Frequently Asked Questions
Can I use canned pears instead of fresh? While possible, canned pears lack the texture and flavor of fresh. If using canned, choose pear halves packed in juice rather than syrup, and pat them dry before baking to encourage slight caramelization.
What’s the best blue cheese for beginners? Gorgonzola Dolce offers a milder introduction to blue cheeses. Its creamier texture and less assertive flavor make it approachable while still providing the characteristic tang that complements the sweet pears.
Can I prepare this entirely ahead? You can bake the pears up to 2 hours ahead and keep them warm in a low oven. Add the cheese and honey just before serving for best texture and presentation.
How do I know when the pears are perfectly baked? The pears should yield easily to a knife but still hold their shape. They’ll continue softening slightly after removal from the oven, so err on the side of slightly firm.
Can I grill the pears instead of baking? Absolutely! Grill halved pears cut-side down over medium heat until tender and lightly charred, then proceed with the cheese and honey topping.
Additional Resources
Related recipes that complement these Best Warm Baked Pears with Blue Cheese & Honey include savory pear salads, cheese board guides, and honey-based desserts. Technique guides for fruit preparation and cheese selection help perfect the execution. Seasonal variation ideas allow adaptation throughout the year based on available produce.
Equipment recommendations focus on quality basics rather than specialty tools. A good baking dish promotes even cooking, while a honey dipper controls drizzle precision. Ingredient sourcing guides help locate the best pears, artisanal cheeses, and local honeys for superior results.
PrintBest Warm Baked Pears with Blue Cheese & Honey
Description
A delightful combination of sweet pears, tangy blue cheese, and golden honey, baked to perfection for a warm and elegant dessert or appetizer.
Ingredients
For the Crust:
- 4 ripe but firm pears, halved and cored
- 1/2 cup crumbled blue cheese
- 2 tablespoons honey
- 1/4 cup chopped walnuts
- 1 tablespoon olive oil
- 1/2 teaspoon ground cinnamon
- 1/4 teaspoon sea salt
Instructions
1. Prepare the Crust:
- Preheat oven to 375°F (190°C). Lightly grease a baking dish with olive oil.
- Arrange pear halves cut-side up in the baking dish. Drizzle with olive oil and sprinkle with cinnamon and salt.
- Bake for 20-25 minutes until pears are tender. Remove from oven, top with blue cheese and walnuts, then drizzle with honey. Serve warm.
Notes
You can customize the seasonings to taste.


