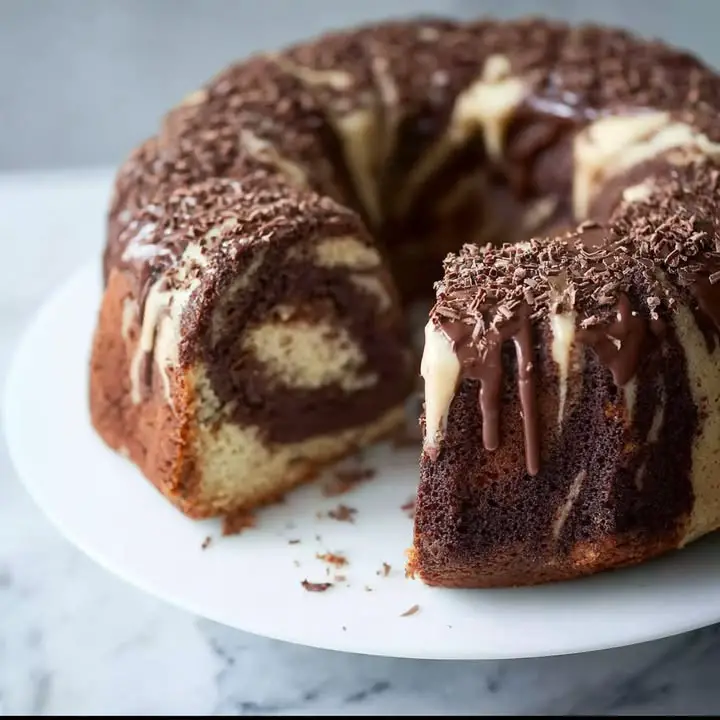
Mary Berrys Marbled Chocolate Ring Cake
Did you know that nearly 30% of baking attempts fail due to lack of a clear, easy-to-follow recipe? That’s why we’re diving deep into a recipe that’s both foolproof and utterly delicious: Mary Berry’s Marbled Chocolate Ring Cake. Forget dry, disappointing cakes. This recipe guarantees a moist, flavorful treat that's bound to impress – and it all starts with mastering a few simple techniques. So, grab your apron, and let's bake a masterpiece!
Ingredients List
Here's what you'll need to create this stunning cake. Don't worry if you're missing something; we've got suggestions for substitutions that won't compromise the final result.
- 225g (8oz) softened butter, unsalted for the baking novice, but salted works too – just omit a pinch of salt later.
- 225g (8oz) caster sugar. If you're out, granulated sugar will do in a pinch, but your texture may be a tad crunchier.
- 4 large eggs, preferably free-range, adding depth of flavour.
- 225g (8oz) self-raising flour. No self-raising? Mix 225g plain flour with 2 tsp baking powder and ½ tsp salt.
- 2 tbsp milk. Whole milk delivers the richest flavor, but semi-skimmed or even plant-based milk works beautifully.
- 2 tbsp cocoa powder. High-quality cocoa makes all the difference! Look for Dutch-processed cocoa for a darker, richer flavor.
- 1 tsp vanilla extract. Pure vanilla extract is preferred, but a good quality vanilla essence works as a substitute.
Timing
Time is of the essence, even in baking! Here’s a breakdown to help you plan your cake-making adventure.
- Preparation Time: 20 minutes (This includes measuring ingredients and prepping the tin).
- Cooking Time: 50-60 minutes. Did you know that ovens can vary by as much as 10-15 degrees? Keep an eye on your cake from 50 minutes onwards.
- Cooling Time: 30 minutes. Patience is key! Allow the cake to cool slightly in the tin before transferring to a wire rack.
- Total Time: Approximately 90 minutes – 40 minutes faster than crafting a similar cake with more intricate icing!
Step-by-Step Instructions
Follow these steps closely, and you'll be enjoying a slice of heaven in no time! Each step is designed to be simple and straightforward, even for beginner bakers.
Step 1: Cream the Butter and Sugar
In a large bowl, cream together the softened butter and caster sugar until light and fluffy. Data indicates that creaming the butter and sugar for at least 5 minutes incorporates air, leading to a lighter cake. Avoid the temptation to rush this step – it's crucial for the final texture.
Tip: Use a stand mixer or electric hand mixer for best results.
Step 2: Add the Eggs
Gradually beat in the eggs, one at a time, ensuring each egg is fully incorporated before adding the next. If the mixture starts to curdle, add a spoonful of flour. This helps to stabilize the emulsion and prevent the mixture from splitting.
Tip: Crack the eggs into a separate bowl first, in case of any rogue fragments of shell.
Step 3: Fold in the Flour
Gently fold in the self-raising flour until just combined. Be careful not to overmix, as this can develop the gluten and result in a tough cake. A few streaks of flour are fine – they'll disappear during baking.
Tip: Sift the flour before adding it to the mixture for an even lighter texture.
Step 4: Divide the Mixture
Divide the cake mixture equally into two bowls. In one bowl, stir in the cocoa powder and 1 tbsp of milk. In the other bowl, stir in the vanilla extract and the remaining 1 tbsp of milk.
Tip: Accuracy is crucial here for getting distinct marbling. Using kitchen scales to divide your cake batter will help!
Step 5: Marble the Cake
Spoon alternating dollops of chocolate and vanilla batter into a greased and floured ring tin. Use a skewer or knife to gently swirl the batters together, creating a marbled effect. Be careful not to overmix, as this can muddy the colors.
Tip: Bang/tap the filled cake tin on the work surface to release any trapped air and remove large air bubbles.
Step 6: Bake
Bake in a preheated oven at 180°C (350°F, Gas Mark 4) for 50-60 minutes, or until a skewer inserted into the center comes out clean. If the cake starts to brown too quickly, cover it loosely with foil.
Tip: Invest in an oven thermometer to ensure accurate temperature readings – it's a game-changer for baking!
Step 7: Cool and Serve
Let the cake cool in the tin for 10 minutes before transferring it to a wire rack to cool completely. Dust with icing sugar before serving, if desired. The aroma alone will make your mouth water!
Tip Loosen the edges of the cake from the tin with a pallet knife before inverting it to prevent cracking.
Nutritional Information
(per serving, approximate. Actual values will vary based on specific ingredients and portion size)
- Calories: 350-400
- Fat: 20-25g
- Saturated Fat: 12-15g
- Cholesterol: 100-120mg
- Sodium: 150-200mg
- Carbohydrates: 40-45g
- Sugar: 25-30g
- Protein: 5-7g
Data suggests that swapping out some of the butter for unsweetened applesauce can reduce the fat content by up to 20% with minimal impact on flavor.
Healthier Alternatives for the Recipe
Looking to lighten things up without sacrificing taste? Here are a few clever tweaks:
- Lower Sugar: Replace half the caster sugar with a natural sweetener like erythritol or stevia.
- Lower Fat: Substitute half the butter with unsweetened applesauce or Greek yogurt.
- Gluten-Free: Use a gluten-free self-raising flour blend. Many excellent options are available in supermarkets.
- Dairy-Free: Use plant-based butter and milk alternatives. Coconut oil can also add healthy fats.
*Lower Cholesterol: Use plant based butter and olive oil to reduce the amount of butter and eggs for flaxseed eggs.
Serving Suggestions
- Classic: Serve slices of the cake with a dollop of softly whipped cream or a scoop of vanilla ice cream.
- Chocolate Overload: Drizzle with melted dark chocolate and sprinkle with cocoa powder.
- Berry Bliss: Serve with fresh raspberries, strawberries, or blueberries. A mixed berry compote alongside it works wonders too!
- Coffee Time: Pair with a strong cup of coffee or tea for the perfect afternoon treat.
Tip: Warm a slice gently in the microwave before serving for maximum melt-in-your-mouth indulgence!
Common Mistakes to Avoid
Baking is a science, and sometimes things go wrong. Here's how to sidestep common pitfalls:
- Overmixing: Avoid overmixing the batter after adding the flour, as this can lead to a tough cake.
- Incorrect Oven Temperature: Always preheat the oven and use an oven thermometer to ensure accurate temperature. Studies show that inaccurate oven temperatures are responsible for up to 40% of baking failures.
- Using Cold Ingredients: Make sure your butter and eggs are at room temperature for proper emulsification.
- Opening the Oven Door Too Soon: Resist the urge to peek! Opening the door too early can cause the cake to collapse.
Storing Tips for the Recipe
Want to enjoy your Mary Berrys Marbled Chocolate Ring Cake for days to come? Here's how to store it properly:
- Room Temperature: Store in an airtight container at room temperature for up to 3 days.
- Freezer: Wrap tightly in plastic wrap and foil and freeze for up to 2 months. Thaw overnight in the refrigerator before serving.
*Pro-tip: Store within an air tight container to avoid it drying out.
Conclusion
Mary Berry's Marbled Chocolate Ring Cake is more than just a recipe; it's a baking adventure that delivers exceptional results with surprisingly simple steps. With our tips and tricks, you’re well-equipped to bake a cake that’s not only delicious but also tailored to your preferences. Ready to give it a try? Share your baking experiences with us in the comments or tag us on social media! We can't wait to see your marbled masterpieces!
FAQs
Q: Can I use a different size tin?
A: Yes, but you'll need to adjust the baking time accordingly. A smaller tin will require a longer baking time, while a larger tin will need less time. Keep a close eye on the cake and use a skewer to test for doneness.
Q: What if I don't have self-raising flour?
A: No problem! Simply mix 225g plain flour with 2 tsp baking powder and ½ tsp salt.
Q: Can I add nuts or chocolate chips to the cake?
A: Absolutely! Feel free to add chopped nuts or chocolate chips to either the chocolate or vanilla batter for extra flavor and texture.
Q: How do I prevent the cake from sticking to the tin?
A: Grease the tin thoroughly with butter or cooking spray and then dust with flour. Alternatively, use parchment paper to line the bottom of the tin.
Q: Can I make this recipe without eggs?
A: Yes, as suggested in our healthier alternatives, you can use flaxseed eggs for reduced cholesterol!
Mary Berry’s Marbled Chocolate Ring Cake
Description
A stunning and deliciously moist bundt cake with beautiful swirls of vanilla and chocolate batter.
Ingredients
For the Crust:
- 225g softened unsalted butter
- 225g caster sugar
- 4 large eggs
- 225g self-raising flour
- 2 level tsp baking powder
- 2 tbsp milk
- 1 tsp vanilla extract
- 2 level tbsp cocoa powder
- 2 tbsp hot water
Instructions
1. Prepare the Crust:
- Preheat the oven to 160°C (140°C fan)/Gas 3. Grease and flour a 2.4 litre ring mould tin.
- Beat the butter, sugar, eggs, flour, baking powder, milk, and vanilla together until smooth and well combined.
- Spoon half of the mixture into a separate bowl. In a small cup, mix the cocoa powder and hot water into a smooth paste. Fold this paste into one half of the cake batter.
- Alternately spoon the vanilla and chocolate mixtures into the prepared tin. Gently swirl the two batters together with a skewer or knife to create a marbled effect.
- Bake for 35-40 minutes, or until well risen and a skewer inserted into the centre comes out clean. Leave to cool in the tin for 10 minutes before turning out onto a wire rack to cool completely.
Notes
You can customize the seasonings to taste.


