Chocolate Peanut Butter Dream Cake: A Decadent Delight
Picture this: a rich, moist chocolate cake adorned with luscious peanut butter frosting and drizzled with melted chocolate. The Chocolate Peanut Butter Dream Cake is exactly as indulgent as it sounds. This cake is perfect for chocolate lovers and anyone craving the ultimate peanut butter experience. The combination of flavors is simply heavenly—a harmonious blend of creamy, nutty peanut butter and deep, rich chocolate. It’s the kind of dessert that turns any occasion special, making your dining experience memorable with every bite.
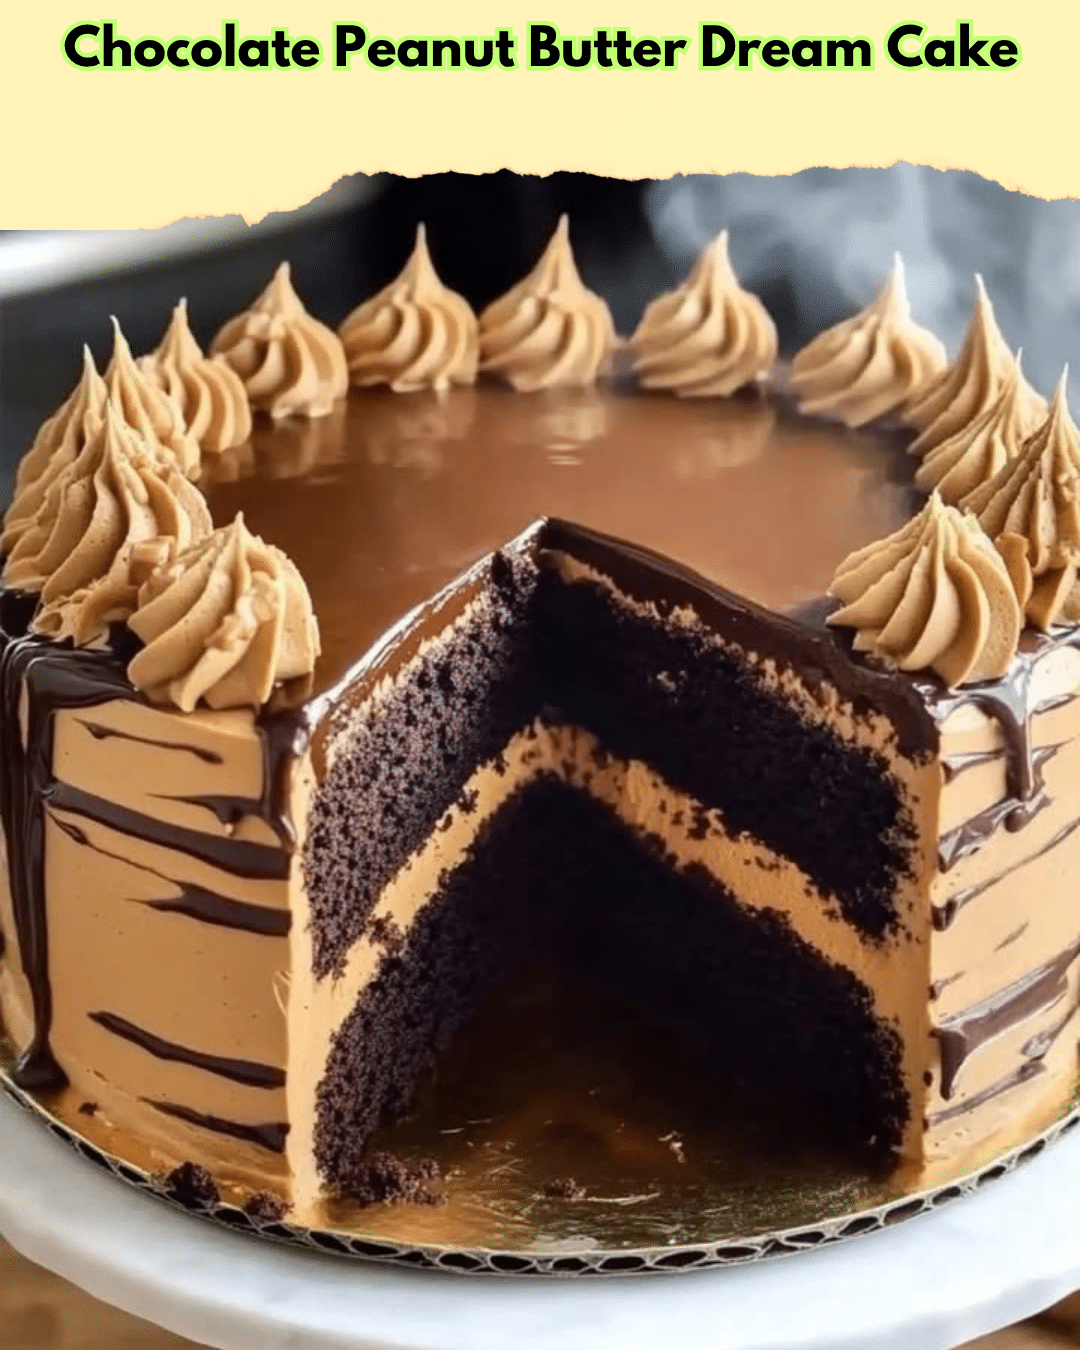
The Chocolate Peanut Butter Dream Cake is not only delicious but also visually stunning. This cake features an alluring dark brown hue from the rich cocoa, complemented by the golden tones of the peanut butter frosting. Each slice reveals layers of chocolatey goodness intertwined with creamy delights. The cake is moist and soft to the touch, each layer exuding its unique, inviting aroma. As you dig into the cake, the delightful combination of textures—smooth frosting and tender cake—will captivate your senses, offering a taste sensation unlike any other.
Quick Recipe Highlights
- Flavor Profile: This cake combines the intense flavors of chocolate with the creamy, nutty notes of peanut butter. The sweetness is perfectly balanced to offer a pleasant taste.
- Texture: The dream cake is moist and soft with a rich, creamy frosting. Each bite offers a sublime melt-in-the-mouth experience while the frosting adds a delightful silkiness.
- Aroma: The enticing aroma of baked chocolate coupled with the nutty scent of peanut butter creates an irresistible blend that will call you back for more.
- Visual Appeal: Each slice of this cake is a work of art with its contrasting layers of dark chocolate and light peanut butter. It makes a stunning centerpiece for any table.
- Skill Level Needed: This recipe requires a moderate level of baking skill, from preparing the cake batter to perfecting the frosting spread.
- Special Equipment: A stand mixer is recommended for a smoother frosting, but a hand mixer will suffice. Cake pans and a spatula for layering are essential tools.
Recipe Overview
- Difficulty Level: The recipe is considered medium due to the various steps involved, like cake preparation, frosting creation, and achieving the perfect drizzle.
- Category: This dessert falls under cakes and pastries—a decadent end to a meal or a standalone highlight for any gathering.
- Cuisine: Drawing on classic American baking traditions, this cake is a tribute to popular flavor pairings that are beloved in American desserts.
- Cost: With ingredients such as chocolate, peanut butter, and quality cocoa, the cake is moderately priced, making it accessible yet luxurious.
- Season: Although perfect year-round, the rich flavors make it an excellent choice for autumnal and winter celebrations when heartier flavors are in demand.
- Occasion: Ideal for birthdays, holidays, and special celebrations, this cake promises a touch of indulgence for both casual and formal occasions.
Why You’ll Love This Recipe
The Chocolate Peanut Butter Dream Cake is all about indulgence, making it a favorite among those with a sweet tooth. The rich chocolate cake pairs perfectly with the creamy peanut butter frosting, creating a taste that’s both classic and sophisticated. The texture is refined, offering softness in every bite along with the smooth, luscious finish of the frosting. It’s truly a culinary masterpiece that combines flavors and textures for a dessert experience that’s hard to rival.
Convenience plays a major role in the appeal of this cake. While it involves a range of steps from baking to frosting, the entire process is straightforward enough for home bakers. The cake can be prepared in parts, allowing for a smooth setup that doesn’t feel overwhelming. Moreover, most of the ingredients are pantry staples, making it accessible even for a last-minute baking adventure.
From a nutritional standpoint, this cake delivers energy-rich ingredients that satisfy cravings. The peanut butter provides a healthy dose of protein and healthy fats, while dark cocoa contributes antioxidants. While it is indulgent, these elements add to the nutritional profile, making it a more mindful treat when consumed in moderation.
Socially, the Chocolate Peanut Butter Dream Cake is a hit. It’s a talking point at gatherings and provides an opportunity for culinary exploration for guests. This cake’s flavors are universally loved, ensuring everyone enjoys a slice (or two). It’s also a great way to showcase your baking prowess, leaving a lasting impression on friends and family.
Despite its rich ingredients, the cake remains cost-effective. The recipe doesn’t call for extravagant items, making it a go-to dessert without breaking the bank. It harnesses the power of high-quality basics to deliver something spectacular. Accessible, delicious, and beautifully crafted, it’s a dessert worth baking for any occasion.
Historical Background and Cultural Significance
The Chocolate Peanut Butter Dream Cake may have modern appeal, but its roots lie deep in American culinary traditions. Chocolate and peanut butter as flavor pairings became popular in the United States early in the 20th century, as both ingredients were widely accessible. Peanut butter was considered an affordable protein source during the Great Depression, while chocolate was a must-have treat, even during times of scarcity. This cake reflects that history by merging these iconic ingredients into one delightful experience.
This dessert holds cultural importance as a representation of American ingenuity in the kitchen. Chocolate and peanut butter, though humble, have together created countless memorable desserts and snacks that have stood the test of time. The Chocolate Peanut Butter Dream Cake takes these two beloved ingredients and raises them to new heights through innovation and culinary skill, preserving the cultural note of indulgence within reach.
With time, the recipe has evolved to cater to changing tastes and dietary preferences. It started as a simple, straightforward combination of flavors, but has since expanded, incorporating gluten-free and vegan adaptations along the way. As the audience for such desserts expands with dietary considerations, so too does the adaptability of this classic pairing.
Across regions, variations emerge, with some preferring a more intense chocolate flavor, while others amplify the nuttiness by including chopped nuts or replacing part of the chocolate with white chocolate. These variations showcase the flexibility of this combination, allowing for adaptation without losing the heart of its classic allure.
Ingredient Deep Dive
Chocolate, at the core of this cake, offers more than just its iconic rich flavor. It has been celebrated in culinary traditions around the world for centuries. The use of chocolate in beverages and treats dates back to ancient Mesoamerican civilizations, making it a product steeped in history. Beyond taste, chocolate provides antioxidants that benefit health, making it a thoughtful addition to desserts.
When selecting chocolate, seek out varieties with a higher cocoa content for a more intense flavor. Dark chocolate is the ideal choice for this cake, offering depth without excessive sweetness. Store chocolate in a cool, dry place to prevent blooming and maintain its quality. If needed, cocoa powder can substitute, though this will alter the texture slightly.
Peanut butter, meanwhile, has gained beloved status across the globe but has deeply American roots. First popularized as an affordable protein source, it adds a distinctive taste and creamy texture to spreads and desserts. Rich in healthy fats, protein, and essential nutrients such as vitamin E and magnesium, peanut butter is more than just a tasty treat.
Choosing the right peanut butter involves preference for texture—some prefer smooth, while others crave a crunchy finish. For a smoother frosting, opt for creamy varieties without stabilizers or added sugars, which can impact results. Store peanut butter in a cool pantry and stir before use for even consistency. Where allergies are a concern, substitutes such as almond or sunflower seed butter can offer versatility without sacrificing allergy considerations.
Common Mistakes to Avoid
- Overbaking the cake leads to dryness. Ensure you check for doneness with a toothpick at the minimum time.
- Not allowing the cake to cool before frosting results in a melted mess. Patience is key!
- Using cold ingredients for the frosting. Let butter come to room temperature for a smooth mix.
- Skipping the sifting process. This results in lumps, affecting texture.
- Wrong measurements. Follow the recipe closely, especially for baking powders and soda.
- Rushing the batter mixing. Overmixing can make the cake dense. Mix until just combined.
- Ignoring the frosting rest time. Letting it sit for a while enhances its spreadability.
- Improper storage affects freshness. Cover and refrigerate for a longer shelf-life.
- Not considering allergies. Peanut allergies require safe ingredient substitutes.
- Wrong pan size impacts baking. Use recommended sizes for an evenly cooked cake.
Essential Techniques
Creaming butter and sugar is crucial for a light, fluffy cake. This technique incorporates air and should be done until the mixture is pale and fluffy, which usually takes about 5-7 minutes with a mixer. Avoid overmixing as it can lead to toughness, and keep an eye on the texture—it should be smooth without visible sugar granules.
Folding, instead of stirring, is key to maintaining air bubbles in the batter. This is particularly important after mixing in the flour and when adding delicate ingredients like whipped egg whites or whipped cream. The folding technique prevents batter deflation, ensuring a light cake.
Frosting application is a delicate art that elevates your cake’s appearance. Begin by securing the first layer of cake to the board with a dab of frosting. Apply each layer with a generous dollop of frosting and use a spatula to spread evenly. Chilling between layer applications helps keep everything in place and prevents sliding.
The drizzle technique uses melted chocolate and requires patience. Start with a high-quality chocolate bar, melted over a double boiler for smoothness. A spoon or piping bag ensures control, allowing you to artfully embellish the top of your cake without overwhelming.
Pro Tips for Perfect Chocolate Peanut Butter Dream Cake
For the richest flavor, always use high-quality chocolate. Cocoa powder may suffice, but it doesn’t quite capture the same depth as solid chocolate.
Chill the cake layers before applying frosting. This reduces crumbs in the frosting and leads to a professional finish.
For added texture, consider incorporating chopped peanuts or chocolate chips into the batter. Both add surprise elements that enhance the sensory experience.
When melting chocolate, the double boiler method prevents scorching and ensures even melting. Stir frequently and avoid any water contact to prevent seizing.
To achieve a smoother frosting, allow your butter to sit at room temperature. It should have a slight give when poked, ensuring it’s workable but not too soft.
Peanut butter selection impacts taste and texture; opt for natural peanut butter for a pure, nutty flavor without additives.
If concerned about the sweetness, balance with a pinch of sea salt. This enhances the nutty tones while curbing excess sugariness.
For a stunning presentation, garnish with roasted peanut halves or chocolate shavings. These add a final touch of elegance and texture.
Variations and Adaptations
Regional variations emerge by incorporating local ingredients or techniques. In southern US states, adding a touch of bourbon lends a sophisticated twist, while some New England bakers incorporate maple syrup for sweetness.
For seasonal adaptations, consider adding cranberry or orange zest to the layers during colder months, playing off holiday spices, and enriching the cake’s depth.
For dietary modifications, swapping out standard flour for a gluten-free blend won’t alter taste but will create an inclusive dessert. Substituting eggs with flaxseed or chia acts as a binder in vegan adaptations.
For flavor variations, incorporating coffee into the chocolate base intensifies its richness, while adding a touch of cinnamon complements the peanut butter, creating a spiced delight. Alternatively, fold in crushed toffee for a caramel dimension.
Texture modifications can include stirring in frostings with varying peanut butter textures, such as smooth, chunky, or extra creamy, resulting in a new mouthfeel each time.
Presentation alternatives include deconstructing the layers into a trifle or parfait format, allowing for personalized servings and convenient portioning at events.
Serving and Presentation Guide
While presentation starts with an evenly frosted cake, it’s the small details that add personality. Finish each cake with a swirl pattern atop the frosting, achieved easily with the back of a spoon or small offset spatula for a rustic touch.
Garnishing ideas draw from the cake’s core ingredients. Simple elements like roasted peanut shards, chocolate shavings, or a light dusting of cocoa powder offer visual interest. For a more striking look, add vibrant fruits like raspberries or sliced strawberries.
Traditional accompaniments include a warm glass of milk or a scoop of vanilla ice cream on the side. This helps to cut through the richness while providing a cooling counterbalance.
Modern serving suggestions feature mini or cupcake formats for individual enjoyment—perfect for parties or gatherings. This way, each guest receives a personalized dessert without the need for slicing.
Temperature considerations ensure flavors shine; serve this cake at room temperature for full flavor expression. However, chilled storage prolongs its freshness.
For portion control, aim for slices of moderate size, capable of satisfying without overwhelming. The cake’s rich texture allows satisfaction in smaller bites.
Wine and Beverage Pairing
Wine pairings should complement the cake’s richness. Opt for full-bodied offerings like Cabernet Sauvignon or Port, which mirror the depth of the chocolate. These choices enhance the cake’s inherent warmth and spice.
For non-alcoholic alternatives, accompany the cake with coffee, particularly a medium roast or espresso, which cuts the sweetness while enhancing chocolate notes.
If serving tea, strong black teas like Assam or a deep oolong prove complementary, their boldness playing off the cake’s flavors without being overpowered.
Temperature considerations matter; serve cold drinks chilled to contrast the cake’s richness, and hot beverages at a moderate warmth to harmonize.
Serving suggestions include using stemware such as coupe glasses for wine, offering elegance alongside the cake’s decadence.
Storage and Shelf Life
Proper storage extends the life of your cake; keep in a covered container at room temperature for up to three days, away from sunlight to prevent drying.
Refrigerating extends life up to five days but may slightly alter frosting texture. Bring to room temperature before serving for optimal taste.
Containers matter: Choose airtight storage to prevent moisture loss and preserve freshness. Layer parchment between slices in stacks for long-term refrigeration.
Look for signs of spoilage such as off smells or mold, especially if left at room temperature for over three days. Preemptively freezing the cake prolongs life.
When reheating slices, use a microwave at half power to gently warm without melting the frosting, ensuring each serving tastes freshly baked.
Freezing guidelines suggest wrapping tightly in plastic wrap before placing in freezer bags for up to a month. For optimal taste, thaw in the fridge overnight and bring to room temperature before serving.
Make Ahead Strategies
Advance planning eases the stress; prepare and bake cake layers up to a week ahead, wrapping and storing in the freezer until ready to assemble and frost.
During the prep timeline, make the frosting a day before assembly. Allow it to rest in the fridge where flavors meld, creating a smoother finish.
If storing between steps, ensure complete cooling of cake layers to prevent condensation in storage that leads to sogginess.
Quality impact remains a consideration; freshly assembled cakes maintain better texture compared to long-stored alternatives.
When assembling, allow frosting to sit briefly at room temperature before spreading to avoid tearing the cake.
Reheating guidelines call for gently warming chilled slices for softening without melting, ensuring each piece delivers the perfect taste.
Brighten up each serving with fresh fruit or chocolate drizzles post-reheating for visual appeal.
Scaling Instructions
While halving the recipe caters to smaller gatherings, doubling requires careful consideration. Mind baking times, as separate pans may require individual attention.
Adjustments in equipment are necessary; doubling necessitates large-capacity mixers and extra baking sheets to handle increased batter volume.
Timing modifications should take center stage, allowing extra time for cooling larger cakes and ensuring even baking through piecewise assembly across multiple pans.
For storage considerations, layered wrapping and segmenting the cake assist in longer shelf life for large-scale bake-offs.
Ensure flavors hold by thoroughly mixing larger quantities and ensuring consistency in every slice, offering satisfaction down to the last morsel.
Nutritional Deep Dive
This cake’s macro breakdown reflects proportions typical of desserts: rich in carbohydrates from sugars, fats from chocolate and peanut butter, and a protein boost from nuts for balance.
Micronutrient analysis shows significant amounts of vitamin E from peanut butter and cocoa-based antioxidants, presenting health advantages in moderation.
Enjoy this dessert for special occasions considering its enrichment of vitamins and minerals, promoting indulgence thoughtfully integrated into balanced diets.
Address dietary concerns by opting for alternative sweeteners or varied nut butters that consider alterations in susceptible populations and custom preferences.
Portion analysis ensures targeted enjoyment, with slices created in measured moderation reducing caloric intake while keeping flavors intact and satisfying.
Consider weight management tips like smaller slices or alternating between natural, lower-sugar sweeteners, keeping dessert moments joyful while being mindful.
Dietary Adaptations
Crafted modifications cater to gluten-free needs, swapping traditional flour for blends ensuring no adverse reactions for gluten-sensitive diners.
For those eliminating dairy, replacing butter with plant-based options like coconut oil or margarine maintains preferred textures without lactose allergies.
Vegan adaptations thrive by substituting egg-based binds with flaxseed or applesauce, ensuring a seamless taste for non-animal product diets.
Low-carb restrictions adapt by integrating almond or coconut flours, maintaining reduced carb content while preserving core flavors.
Incorporate keto adjustments such as replacing sugar with erythritol or monk fruit sweeteners, minimizing glucose spikes.
Paleo alternatives arise through entire milk replacements with almond or coconut variations, supporting dietary programming.
Low-FODMAP switches enable sensitivity management, where alternative nut butters and suitable sweeteners afford a harmonious experience.
Other specific diets ensure everyone enjoys a slice by formulating adjustments like allergen-free peanut-safe butters or replacing nuts with alternatives like sunflower seeds.
Troubleshooting Guide
If texture issues like dryness prevail, confirm proper measurement of wet ingredients and baking time limitations to achieve a tender outcome.
Balance flavor by moderating sugar where needed and considering a coffee dash for depth augmentation, brightening chocolate notes when desired.
Overheated chocolate can pirate essential frosting elements, so safeguarding against high temperature rebound preserves sauce richness.
Adjust for equipment insufficiencies by dividing recipe demands, like doubled mixers or multiple cake pans accommodating larger scale needs.
Ingredient substitutions demand thoughtful testing; flavors may alter based on brand or type, ensuring replacements complement the cake’s spirit.
Verify timing concerns with a kitchen timer, minding over-bake avoidance and increment adjustments for depth measurement mattering in perfect execution.
Recipe Success Stories
Community feedback reveals abundant positive experience with the Chocolate Peanut Butter Dream Cake. Testimonials acclaim the cake’s sensational flavors as ringing endorsements in enthusiast kitchens.
Variations show inventive spirit; a reader shared success adding espresso for a mocha twist, applauded by dessert attendees seeking new depth.
Adaptations thrill nutrition enthusiasts satisfyingly; a revised version features almond flour, adored by gluten-conscious guests who appreciate the inclusive recipe tailoring.
Reader suggestions commonly feature garnishing tips. Flourished mint or increasing zest converts an everyday cake into an elegant table delight.
Photography tips advise composition centered on frosting swirls and nut adornments, ensuring each snapshot captures the cake’s esteemed allure desirably.
Frequently Asked Questions
A: Yes, the frosting can be made a day ahead. Just ensure it is refrigerated and brought back to room temperature, so it’s spreadable when ready to assemble the cake.
Q: What kind of chocolate works best?
A: Opt for high-quality dark chocolate that contains at least 60% cocoa. It balances sweetness and offers depth in flavor, complementing peanut butter well.
Q: Are there nut-free alternatives?
A: Absolutely! Sunflower seed butter provides a similar creamy texture without nuts, making it safe for those with nut allergies.
Q: Can this cake be used for special events like weddings?
A: Definitely! While this cake may not be typical for weddings, its rich flavor and visual appeal offer a memorable sweet table addition.
Q: How do I freeze leftovers?
A: Slice the cake and wrap individual pieces tightly in plastic wrap. Store them in freezer bags or containers, and they will keep for up to a month.
Q: Is there a low-carb option available?
A: Yes, replacing sugar with stevia or erythritol and flour with almond flour significantly lowers the carb count while preserving delightful taste.
Q: How do I avoid a dense cake?
A: Ensure you do not overmix the batter once the flour is added. Mix just until combined and no lumps are visible for best results.
Q: Can I use a stand mixer instead of a hand mixer?
A: A stand mixer is ideal for creaming butter and sugar more evenly, but a hand mixer works perfectly fine for smaller batches.
Q: Can this be made as cupcakes instead?
A: Yes, simply adjust the baking time by cutting it down to 20-25 minutes for cupcakes, ensuring they’re moist and delicious in smaller formats.
Q: What storage methods work best for transport?
A: Refrigerating allows the cake to firm up slightly, reducing movement. Use a secure cake box to keep it safe during transportation.
Q: Can children help with this recipe?
A: Absolutely, involving children is a wonderful way to introduce basic baking skills, although supervision is advised, especially during melting and baking steps.
Q: Can I serve this cake warm?
A: It’s best served at room temperature to enjoy its full flavor, though slightly warming may enhance its appeal alongside a scoop of ice cream.
Additional Resources
For those inspired to further experiment with chocolate and peanut butter, explore related recipes like peanut butter brownies or chocolate-drizzled banana bread. These desserts incorporate similar elements, offering variety without departing from the beloved flavor pairings.
Technique guides such as mastering the Bain-Marie method for melting chocolates provide invaluable insights for improving dessert experiences, making sure every chocolate item emanates smoothness and depth.
Further avenues encompass ingredient information: reading about cocoa varieties elevates understanding beyond this cake, while nut butter surveys make informed choices for healthier eating.
Equipment recommendations improve baking ease. Consider investing in a quality stand mixer or reliable silicone spatulas, enhancing precision in recipes like this, granting consistent success and smoother experiences in the kitchen.
Seasonal variations inspire seasonal creativity: delve into spring renditions, incorporating fresh berries for subtle twists in a classic recipe—highlight the universal adaptability families will appreciate in this long-loved cake.
Print
Chocolate Peanut Butter Dream Cake
Description
A rich, indulgent cake combining the flavors of chocolate and peanut butter, perfect for dessert lovers.
Ingredients
For the Crust:
- 1 cup unsweetened cocoa powder
- 2 cups all-purpose flour
- 1 and 1/2 cups sugar
- 1 tsp baking powder
- 1 tsp baking soda
- 1/2 tsp salt
- 2 large eggs
- 1 cup whole milk
- 1/2 cup vegetable oil
- 2 tsp vanilla extract
- 1 cup boiling water
- 1 cup creamy peanut butter
- 1/2 cup unsalted butter, softened
- 2 cups powdered sugar
- 1/4 cup heavy cream
Instructions
1. Prepare the Crust:
- Preheat oven to 350°F and grease two 9-inch round cake pans.
- In a large bowl, whisk together cocoa powder, flour, sugar, baking powder, baking soda, and salt.
- Add eggs, milk, vegetable oil, and vanilla extract to the dry ingredients and mix until smooth.
- Stir in boiling water until well combined, then pour the batter evenly into prepared pans.
- Bake for 25-30 minutes or until a toothpick comes out clean. Allow to cool completely.
- For the frosting, beat peanut butter and butter until creamy. Gradually add powdered sugar and mix until smooth.
- Slowly add heavy cream and continue beating until fluffy.
- Assemble the cake by spreading peanut butter frosting between layers and on top.
Notes
You can customize the seasonings to taste.
